NetPlan is a new network configuration tool introduced in Ubuntu 17.10 to manage and configure network settings easily in Ubuntu systems. It allows you to configure a network interface using YAML abstraction.
This new tool replaces the static interfaces (/etc/network/interfaces) file that had previously been used to configure Ubuntu network interfaces. Now you must use /etc/netplan/*.yaml to configure Ubuntu interfaces.
The new interfaces configuration file now lives in the /etc/netplan directory. There are two renderers. NetworkManager and networkd.
NetworkManager renderer is mostly used on desktop computers and networkd on servers. If you want NetworkManager to control the network interfaces, use NetworkManager as the renderer, otherwise use networkd.
When you use NetworkManager as the renderer, you will use the NetworkManager GUI to manage the interfaces.
In this article, we will explain how to configure a network static or dynamic IP address for a network interface in Ubuntu 17.10/18.04/18.10 Server using Netplan utility.
[box type=”info” align=”” class=”” width=””]See also:
- How to setup netwrork after CentOS 7 minimal installation
- How to configure static IP address on centos 7
- 15 ip Command Examples for Linux Users
[/box]
List all active network interfaces on Ubuntu Server
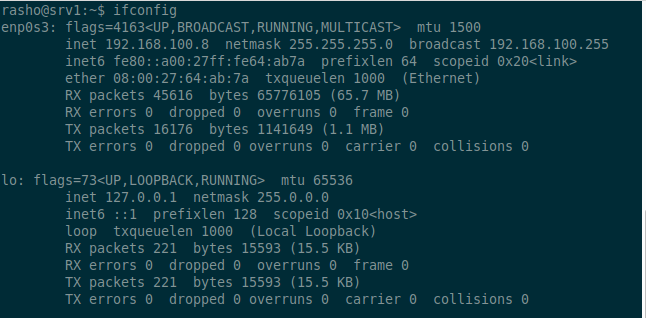
Before configure static IP address, you need to identify the available network interfaces on your Ubuntu server 17.10/18.04/18.10. You can list all attached network interfaces on your system using the ifconfig command as shown.
$ ifconfig

From the output of the above command, we have 2 interfaces attached to the Ubuntu system: 1 ethernet interfaces and the loop back interface. However, the enp0s3 ethernet interface has not been configured and has no static IP address.
Configure Static IP Addresses on Ubuntu server 17.10/18.04/18.10
[ads]
To configure a static IP address using the new NetPlan tool on Ubuntu server, the file should look similar to the content below.
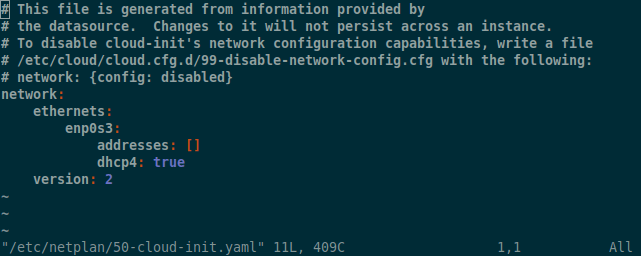
For example you might find a default netplan configuration file in the /etc/netplan directory called 50-cloud-init.yaml with a following content using the networkd deamon to configure your network interface via DHCP.
$ sudo vim /etc/netplan/50-cloud-init.yaml
Then file should look like this one below:

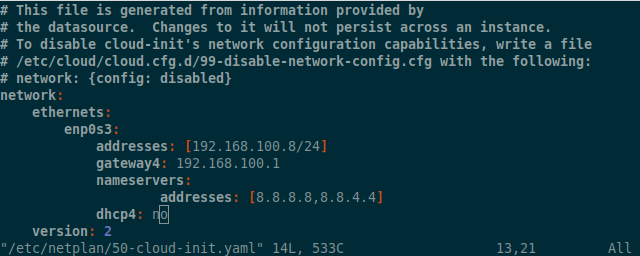
The above is a default networkd redenrer configuration file for a Ubuntu server using DHCP IP configuration. If you want to setup a static IP address, configure the file as shown below.
$ sudo vim /etc/netplan/50-cloud-init.yaml
Then configure IPv4 addresses as shown below. take notes of the format the lines are written.
# To disable cloud-init's network configuration capabilities, write a file
# /etc/cloud/cloud.cfg.d/99-disable-network-config.cfg with the following:
# network: {config: disabled}
network:
    ethernets:
        enp0s3:
            addresses: [192.168.100.8/24]
            gateway4: 192.168.100.1
            nameservers:
                    addresses: [8.8.8.8,8.8.4.4]
            dhcp4: no
    version: 2

Exit and save your changes by running the commands below
$ sudo netplan apply
If there are any issues, run the following command to investigate and check what is the problem in the configuration.
$ sudo netplan --debug apply
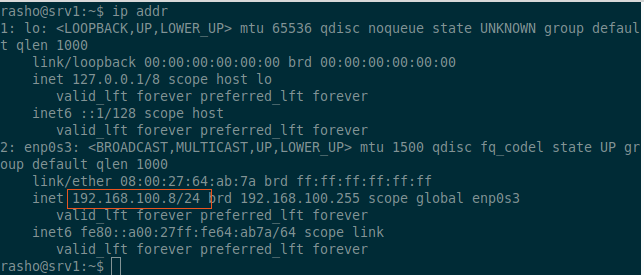
Now, let us check the Ip address using command:
$ ip addr
Sample output from my Ubuntu:

ou can find more information and configuration options by consulting the netplan man page.
$ man netplan
Congratulations! You’ve successfully configured a network static IP addresses to your Ubuntu servers. If you have any queries, share them with us via the comment form below.